


Marketing Service
Your current location: Home - Marketing Service - Technical Information


 2021.04.02
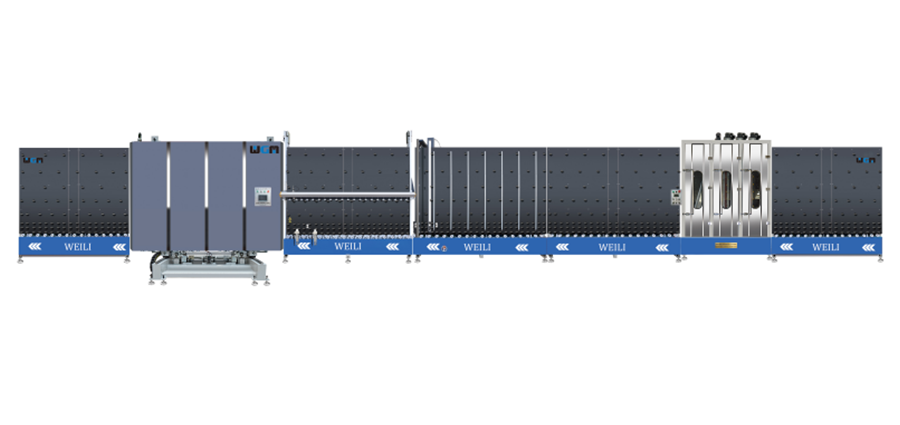
 Weili
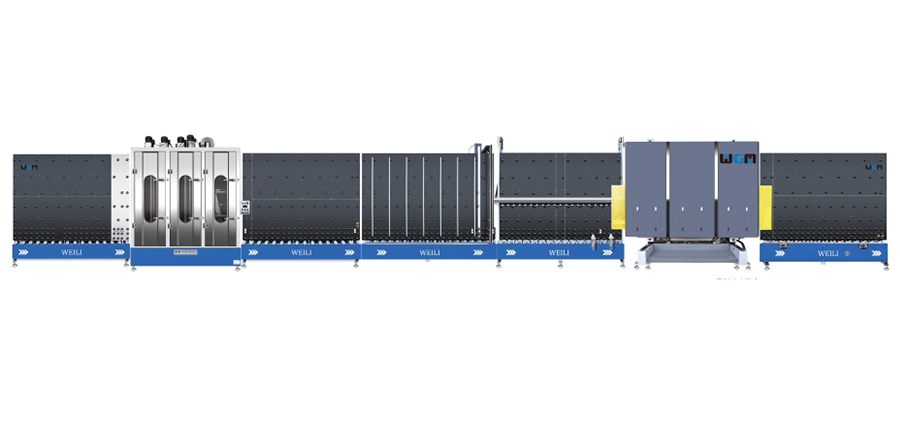
Weili
Clean part
1. The glue mixer is used for glueing on the equipment for about a week, disassemble it and burn it to clean up the dust in the tube.
Use after reinstallation.
2. The black and white rubber check valves are disassembled every 1 month or so and flushed with kerosene smoothly. (Note: When installing, pay attention to the installation direction not to be reversed)
3. After the nut is unscrewed by the connecting block at the front end of the rubber mixer, rinse the inside with kerosene, clean the solidified mixed rubber inside to keep the inside unobstructed, wrap the nut with raw tape and tighten it again.
4. Unscrew the universal joint with a wrench, soak and rinse with kerosene, and clean the solidified mixed rubber inside to keep the inside unobstructed. Wrap raw tape (water tape) around the thread to prevent leakage.
5. Wash the inside of the switch valve with kerosene to clean up the remaining and solidified mixed glue.
6. Clean the glue nozzle connecting rods every 1 month or so. The aluminum parts connecting the glue nozzles are rinsed with kerosene and cannot be burned. After the connecting rods are burned with fire, clean the internal dust and reinstall them for use.
7. Every 1 month or so, disassemble the vinyl filter on the vinyl bucket and soak in kerosene to clean the solidified residual vinyl.
8. Whenever the pressure gauge on the hydraulic station has no pressure (the hydraulic motor is rotating), you need to remove the overflow valve, clean the internal valve needle with kerosene, and reinstall it after cleaning.
9. The hydraulic oil in the oil tank of the hydraulic station is replaced every 1 year or so. To replace the new hydraulic oil, you need to unscrew the oil port, drain all the old hydraulic oil, and then replace the new No. 46 hydraulic oil.
10. Duplex put in filtered water every day, and add lubricating oil.
11. The black rubber check valve above the booster cylinder is soaked and cleaned with kerosene every 1 month or so. (Note: Pay attention to the installation direction when installing, do not install it backwards)
12. Wipe the photoelectric lens clean with a clean cloth before starting work every day to prevent the photoelectric sensor signal from malfunctioning.
13. Check the blockage of the solenoid valve muffler every one month or so, and clean or replace the muffler regularly.
14. Clean the conveyor belt and the board surface before starting work every day, and clean the mixed glue on the V-belt and the board surface.
Lubrication part
1. Use a grease gun to lubricate the oil injection port of the slider part of the machine head for two or three months.
2. Apply lubricating oil to the screw of the machine head centering motor every 1 month.
3. Add lubricating oil to the reducer for 2 or 3 months.
4. Keep the surface of the polished rod of the auxiliary tug cylinder clean, and regularly apply lubricating oil to keep it lubricated.
5. The joint part of the booster cylinder is regularly filled with lubricating oil to keep it lubricated, the piston rod is kept clean, and lubricating oil is regularly applied.
6. The oil cup of the black and white rubber pumping pump is regularly replaced with new lubricating oil to keep the lubricating oil clean and prolong the service life of the sealing ring.
Fastening part
1. The six nuts on the three connecting rods on the upper part of the machine head are tightened every half a month or so.
2. The connecting nuts of the machine head chain are tightened every 1 month or so.
3. Tighten the auxiliary cylinder tug nut every half a month or so.
4. Tighten the connecting rod nut at the bottom of the V-belt every half a month or so.
Exception handling
1. The emergency stop operation is effective under any circumstances. When an emergency occurs and an abnormal situation occurs during work, the current work will be terminated when the emergency stop is photographed; the emergency stop contains a reset function, and the emergency stop is pressed for 3 seconds after the Let it go, all faults and some wrong actions will be restored. After releasing the emergency stop, operate the device to return to zero again. After the return to zero, you can continue the operations that need to be performed.
2. Matters needing attention
A: When the misoperation and non-action caused by some abnormal signals during the glue application process, you can take the emergency stop button to deal with it or the equipment can be re-powered and run;
B: It is strictly forbidden for anyone to enter the glue application area during the glue application process to avoid injury;
C: Do not approach any sensor of the device with hands or other tools during the glue application process, and it will cause a malfunction on one side;
D: Unloading during automatic operation must be carried out in the unloading section, and it is forbidden to remove the coated glass from the discharge end (middle);
E: If you want to stop the machine after the glue is applied, you must perform a cleaning action to prevent the black glue from solidifying in the mixer, and stop when the extruded glue is completely white;
F: Pay attention to keeping the equipment clean, especially the glue nozzle part and the conveyor belt;
3. Operation of sudden power failure
First of all, remember that the gas tank must have enough air pressure after a power failure
1. A person wraps the glue nozzle with a plastic sheet in front to prevent glue from spraying on the back-to-board.
2. Another person goes to the back of the machine head and finds the bottom solenoid valve (this solenoid valve is the main valve that controls the switch of the mixed glue). There is a red (blue) button on the solenoid valve, (the red button is pressed inward at the same time Rotate 90 degrees clockwise to lock the solenoid valve; press the red button inward and rotate 90 degrees counterclockwise to return the solenoid valve.) Let the solenoid valve lock.
3. Go to the position next to the white glue barrel and find the two-way solenoid valve that controls the white glue cylinder. This solenoid valve has 2 red buttons. Press the red button above and then the button below until the glue nozzle of the machine head appears white. The glue can be.
4. Then press the red button and press it in while rotating it 90 degrees counterclockwise, and then the solenoid valve will return to its position.

Hotline of sales:
+86 18660431138/18663713068
Email:weili001@weiliglass.com
Add:
1-1407 Meilin Mansion wuyingshan middle road Tianqiao District Jinan city Shandong Province China
Order now